Showing posts with label watts grocery. Show all posts

Monday, June 20, 2016

Weekend baking

IMG_3599
I am a creature of habit.  I have morning routines.  Even on Saturdays and Sundays.  Even during summer vacation. I like to get up, make the coffee, feed and water the cat, and bake.  The house is quiet.  It’s just Callie Cat and me, although she isn’t always quiet.  I think she really misses Rusty, her brother, who died a month or so ago.  She meows a lot more now.  Muffins are my favorite to bake because they are quick and the Ex-Ex likes to eat them for breakfast.  Scones are fun, too.  So is banana bread, but it takes a lot longer to bake, therefore I usually do that at night.
I like to make things from scratch.  I kind of hate to admit that I have become a mix snob, but I have.  Baking mixes were all the rage when I was growing up.  New and exciting.  And a lot of unpronounceable stuff added in, as we all now know.  I succumb once in a while, but I read labels now.  A chef friend of mine swears that high fructose corn syrup is the devil’s elixir, so I avoid that like the plague.  I use King Arthur‘s all-purpose flour.  I have fallen in love with that company.  It’s 100% employee owned and their motto is “Try it once, trust it always.”  Check out their recipes and company story and you will, too, I bet.
I am an amateur and I have been baking for as long as I can remember.  Cookies, pound cakes, pies, cupcakes, biscuits, bread. I’ve taken a few baking classes. Macaron-making with Amy Tornquist of Watts Grocery and Hummingbird Bakery here in Durham (my city is an eating destination these days- I don’t really like the word foodie, so I don’t use it, but google Durham, NC and see what you get).  I taught Amy’s daughter and she helped her mom with the class which made it twice as much fun.
lizzie macs
I took a macaron-making class in Paris this past March with my students at L’Atelier des Gâteaux.  Several of the kiddies wanted to do this and, well, truth be told, they did not have to twist my arm.
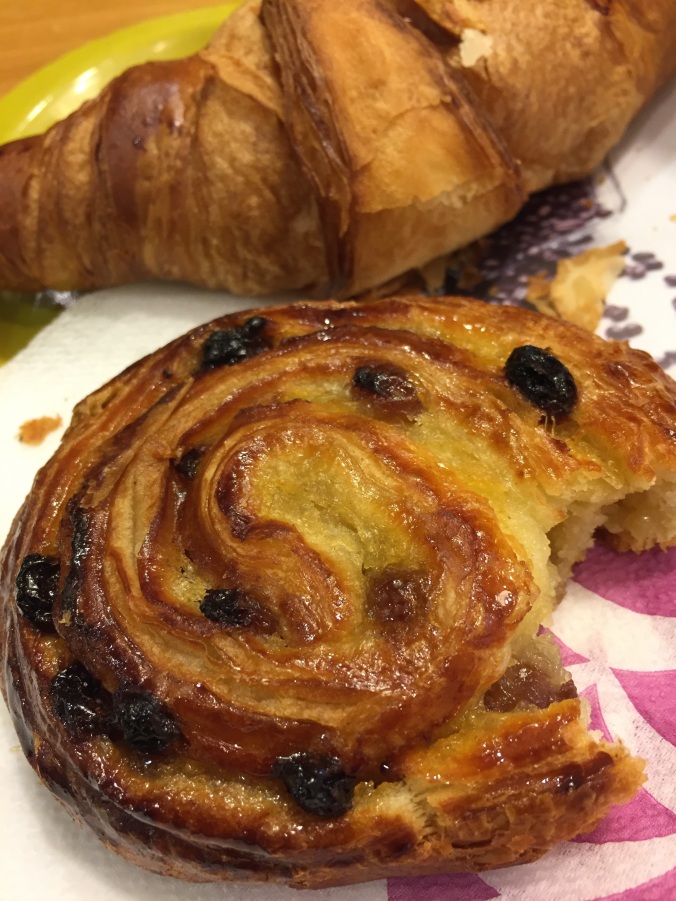
My most recent baking class actually turned out to be two classes (the ovens weren’t working properly the first time so we were invited back to try again) taught at Sur la Table at Southpoint Mall.  Judy C suggested learning how to make croissants and I took her up on the invitation.  I love croissants.  Is there anything better than starting the day with a warm croissant, preferably eaten in France, with a cup of hot café au lait, people watching?
arles croissant
Non. Well, unless it’s a pain aux raisins
painauxraisins
I digress.
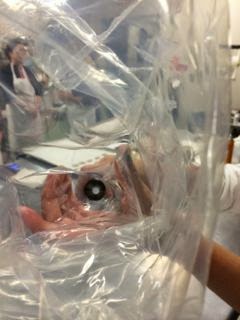
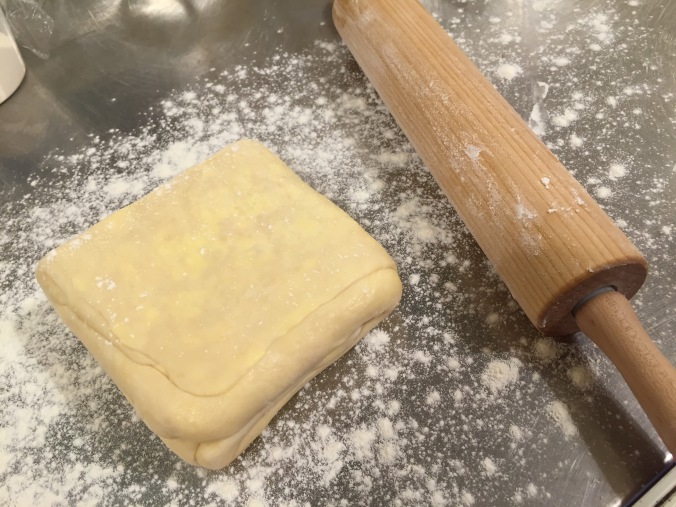
Back to the croissant-making.  It’s not as hard as I thought.  Time-consuming, oui.  You must plan ahead.  Jane Bobroff, a professional baker, was our teacher for Croissants from Scratch.  A woman who loves butter as much as I do.  Maybe even more.  King Arthur is one of Sur la Table’s sponsors, so I was quite happy.  Some of the baking vocabulary was in French since these little darlings are iconically as français as Maurice Chevalier.  Détrempe and beurrage. The dough block and the butter block.  Lessons in activating yeast, incorporating the beurrage, folding properly- letter and book folds, proofing the dough, egg wash, baking for longer than you think you should.  The class was a bit backwards since it takes a while to get the dough from yeast to oven.  We started with dough already prepared for us,
croissant dough
made our croissants,
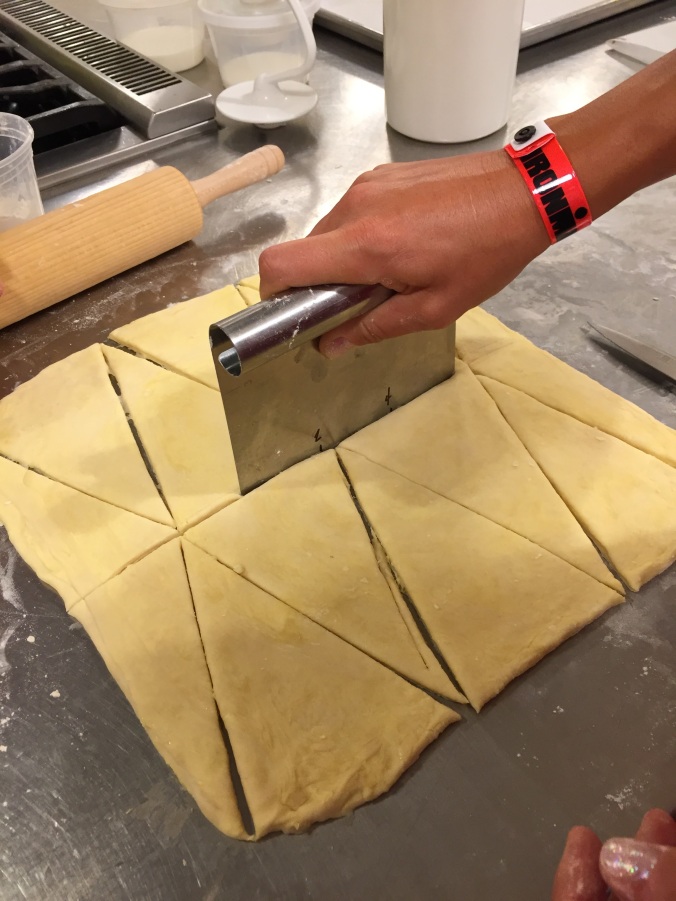
cutting
set them to rise,
rising
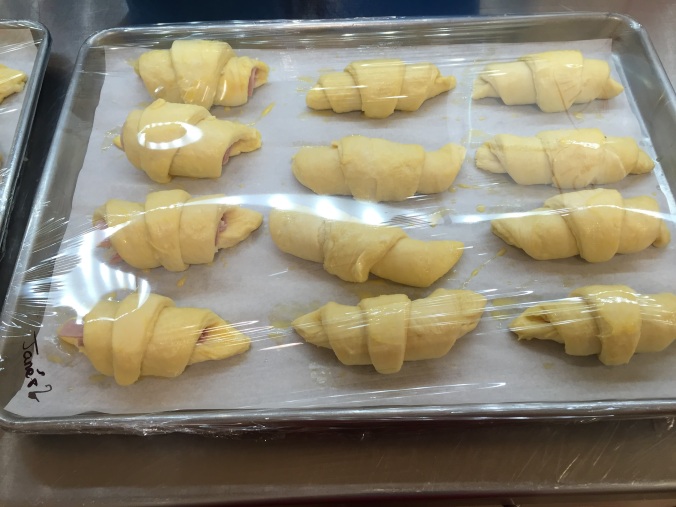
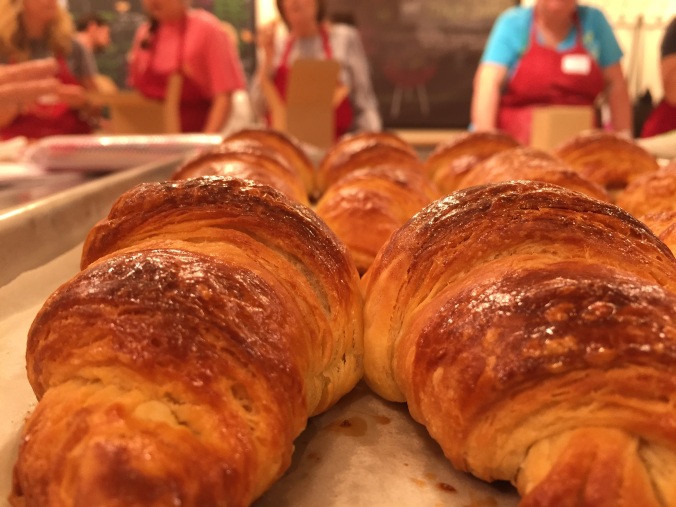
and while we were waiting for them to double in size, we prepared dough for the next class.  We made Classic Croissants, Pain au chocolat, and Parisian Ham and Gruyère Croissants.
croissants slatable
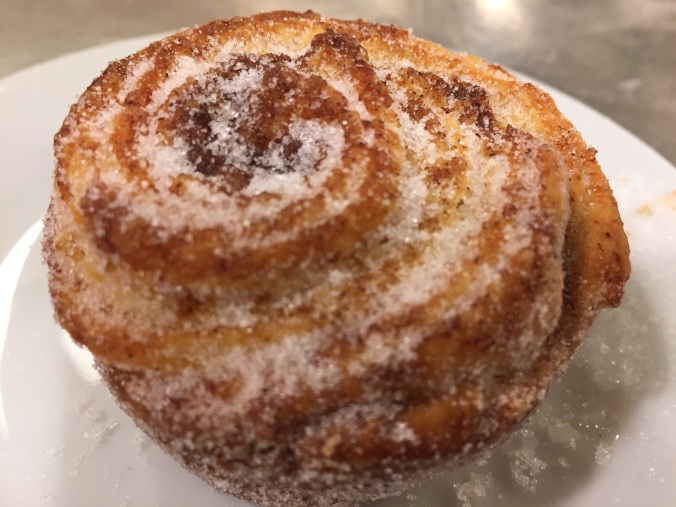
Chef Jane also uses this dough for Morning Buns, croissant dough rolled with cinnamon and sugar and baked in muffin tins.
cinnamon
I will try this at home, now that I have taken the class twice, but I advise you to find a class or, if you follow directions well and are patient, to devote a Saturday morning to the process.  Planning backwards is a good idea.  Figure out when you want thesepâtisseries to come out of the oven and work back from there.
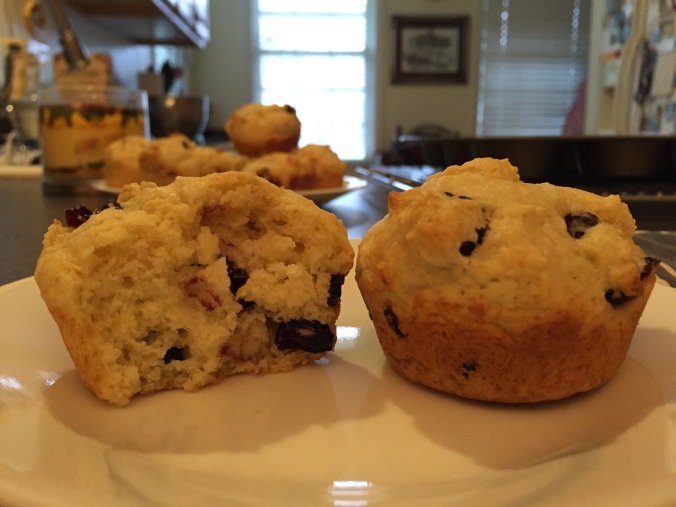
For a much quicker breakfast treat, I will share my favorite, foolproof muffin recipe.  I have made many variations of this recipe since finding it in Better Homes and Gardens New Cookbook Special Edition (in support of the Susan G. Komen Breast Cancer Foundation).  It is the 12th edition of this well-known and well-loved American bible of cooking, originally published in 1930.  This edition was published in 2003.  The muffin recipe page came loose long ago and is held in place with a paperclip.
Muffins
Prep: 10 minutes.  Bake: 15-18 minutes.  Oven: 400˚F.  Makes: 12 medium-sized muffins
1-3/4 c. all-purpose flour
1/3 c. granulated sugar (or sometimes I use turbinado sugar)
2 tsp. baking powder (preferably aluminum free)
1/4 tsp. salt
1 large egg, beaten
3/4 c. milk
1/4 c. cooking oil
1 recipe Streusel Topping (optional- I rarely make it)
  1. Grease twelve medium muffin cups (2-1/2 in.) or line with paper baking cups.  Set aside.
  2. In a medium bowl, whisk together flour, sugar, baking powder, and salt.  Make a well in the center of the mixture; set aside.
  3. In another bowl, whisk together egg, milk and oil.  Add egg mixture to flour mixture.  Stir just until moistened.  Do not overmix- batter should be lumpy.
  4. Spoon batter into prepared muffin cups, filling each 2/3 full.  If desired, sprinkle Streusel Topping over batter in cups.  Bake in a 400˚F preheated oven for 15-18 minutes or until golden and a wooden toothpick inserted in the center of a muffin comes out clean. Cool in muffin cups on a wire rack for 5 minutes.  Remove muffins from pan.
Streusel Topping
3 Tbsp. all-purpose flour
3 Tbsp. brown sugar
1/4 tsp. cinnamon
2 Tbsp. cold butter
2 Tbsp. chopped nuts, if desired
Combine the flour, brown sugar and cinnamon.  Cut in the butter until the mixture resembles coarse crumb.  Stir in nuts, if using.
Add-ins I’ve tried-  don’t be afraid to be creative here
Note:  Gently fold in fruit and peels at the end.  Extracts or flavorings should be added to the egg-milk mixture.  Spices, such as cinnamon, should be added to the flour mixture.
1 c. fresh or frozen blueberries, 1 tsp. finely shredded lemon peel
1 c. coarsely chopped cranberries and 2 Tbsp. additional sugar
Reduce flour to 1-1/3 c. and add 3/4 c. rolled oats to flour mixture (mini-chocolate chips maybe?)
Increase sugar to 1/2 c. and add 1 Tbsp. poppy seeds to flour mixture.
Reduce milk to 1/2 c. and stir in 3/4 c. mashed banana and 1/2 c. chopped nuts into the flour mixture along with the egg mixture. (best not to use paper cups for this one- they really stick to the paper)
1 c. Craisins ( any flavor)
1 medium-sized apple, peeled, cored and diced (Pink Lady, Granny Smith, Honey Crisp work well) plus 1 tsp. cinnamon
1 cup of chopped, pitted cherries, fresh or frozen, plus 1 tsp. almond extract
Bon appétit and happy baking!  Your eaters will love you and your kitchen will smell heavenly.  Sip your coffee while they bake, as I do, and read Sean Dietrich‘s daily posts about life in the South.  I follow him on Facebook and he is always amazing.  We are yet-to-meet-in-person best friends.  His wife, Jamie, is a killer cook.  I beg her for recipes.  I have no shame.  Check out what I’ve written about them here and here

Wednesday, October 22, 2014

Making macarons like a pro


I am going out on a limb here and declaring that I have eaten the best macarons ever.  Oui, ever, even including the ones I've had in Paris at some very chic and famous shops.
It all started a few weeks ago when a student, LK, brought some in for her classmates.


Her mom, Amy Tornquist, is a local chef and restaurant owner (Hummingbird Bakery, Watts Grocery, Sage and Swift).  (Dad is also a chef and quite an accomplished artist.). LK made these macarons with their pastry chef, Susie.  I asked if Susie would be willing to give me a lesson and LK responded that her mom was thinking about offering a macaron making class.  Just a week or so later, the email popped up in my box and I immediately signed up.
It was a small class.  There were only 8 or so of us.  Arles Lucy signed up, as did Iron Woman.  Two mothers of students and one grandmother were also there.
Introductions were made-


And Susie, in the hat, and crew set about showing us the how-tos.
First, a tamis, also known as a drum sieve, comes in handy for getting all the lumps out of the ground almonds, confectioner's sugar and cocoa.  It was suggested that perhaps on my next trip to Paris I should go to E. Dehillerin or another shop to find one.  And I have to confess that I've never been to that shop even though Julia Child wrote about it often.  (now on the agenda for the January trip)
Then some eggs whites were added to the almond meal mixture-


This mixture should be about the consistency of Play-doh, for those of you who remember getting your hands in that as a kid.  Thick.
Next comes the step that I was curious about.  Would Susie use French meringue or Italian?  Italian. This consists of heating water and sugar to make a syrup, then adding that to egg whites and beating it into stiff, glossy peaks.


This meringue is added to the almond mixture by thirds to make sure not to add too much.  It is hard, if not impossible, to go back and add more almond flour if the batter becomes too thin.  This meringue doesn't have to be folded or handled gently.  The egg whites are very stable.
The batter should now look like melted ice cream, but thicker.


It is now ready for the pastry bag.  It was great to get pastry bag handling tips from pros.  I feel much more confident now.  I am usually a mess after dealing with a pastry bag.  A round tip with a fairly large opening works best.  And it may sound silly to have to say this, but I didn't know so here goes... fold down the top of the pastry bag so that if it gets messy, it's okay because you are going to pull it back up before you pipe!


Now, to pipe.  LK is really good at this and showed us how to do it.


Susie has a sheet of parchment paper that she uses as a template.  She traced around a jar of sprinkles to get the proper size and she puts the template under another sheet of parchment so that she can see the circles and not mess up her template.  Genius, n'est-ce pas?  I had previously tried to pipe in circles.  Nope.  Just put the tip down, squeeze the pastry bag and when the cookie is the right size, staying just inside the circle, lift up the tip.  (In The Kings of Pastry, Jacquy makes little noises as he does this-- LK reminded me of this and said it might help! I showed this movie to my 7th grade classes last year and they loved it and at least one of them remembers it.)
The macarons now need to sit for 15-20 minutes to "dry."  They go from shiny to a matte finish and when they are ready you can touch them without getting dough on your fingers.


Susie's husband showed me a trick to not waste a bit of the macaron dough/batter.  Use a pastry scraper.


Next, in the oven, then allow them to cool before peeling them from the parchment paper.
Fill with whatever you wish-- buttercream, ganache, fruit jam, Nutella.  The sky is the limit here.
LK was filling these with a peanut butter buttercream.


She also made some with buttercream around the edges and then chocolate ganache in the middle. The cookies should now go in the freezer.  Yep, that's right.  That helps bring out the flavor.  I left mine in overnight, but Susie says they should be in for at least an hour.
We were given ganache to take home and fill ours with, but we were asked to sample Susie's creations made the day before.  Sigh.  Someone has to do it, you know.


Crummy photo-- focused on my hand and not the macaron, but who can blame me?  I wanted to get back to my taste test.  Salted caramel, candied peanuts and chocolate were involved here, people.
I ate both of them.


We then tasted one that we had just baked and LK had filled with the peanut butter buttercream.  (Again, sorry for the crummy photo...)


It was delicious, but I could indeed tell the difference.  The flavors hadn't had time to meld and the cookie was crunchier than the first two that had spent some time in the freezer.  (Allowed to thaw, of course.)
Susie's husband was in my group.  He is a great piper.  Very steady hands.


My little macarons were given out to a few good friends who seemed to truly enjoy them.  That's the joy of baking... making people happy with little bites of deliciousness.


I got a little sloppy with the ganache.  Must do better next time.
(I have a bowl of egg whites in my refrigerator this very minute liquifying so that I can give it a try again, this time with Italian meringue.  I am thinking pink ones with a buttercream/raspberry jam filling.)

Susie's Chocolate Macarons
(if you do not want to make chocolate cookies, leave out the cocoa; if you want to color them, use gel coloring added to the egg whites so that you are not adding too much liquid)

212 g almond flour
212 g confectioner's sugar
2 Tbsp Dutch processed cocoa powder

Sift these ingredients in order to remove lumps.

82 g egg whites (separate them and let them sit for at least 24 hours-- you need 172 g total for the macarons)

Add the egg whites to the almond-sugar mixture and mash it in until it is the consistency of Play-doh.  Don't add too much- it's hard to go back and add more almond flour at this point without making the batter lumpy.

236 g granulated sugar
158 g water

Heat the water and sugar to 238˚F.  Use a candy thermometer to get the precise temperature.  Do not let the thermometer touch the bottom of the pot, though, or you will get a false reading.

In the bowl of a mixer, beat 90 g of egg whites with a pinch of sugar until soft peaks form.  After 5 minutes, add the syrup and mix until stiff peaks form.  Err on the side of too stiff, if in doubt.

Add about one-third of the meringue to the almond-sugar-egg mixture and mix well with a spatula. You do not have to be gentle.  Add another third and keep mixing until the mixture looks kind of like melted ice cream, but still rather thick.  Better too thick than too thin.  (If you have leftover meringue, you can bake them into meringue cookies later!)

Fit your pastry bag with a round tip (#806) and pipe onto parchment paper.  Allow the macarons to sit until the finish goes from shiny to matte, about 15-20 minutes.

Bake at 325˚F for 13+ minutes, according to your oven's temperature.

Take them out, let them cool on the parchment paper and then peel them off.  Fill them and place in the freezer overnight or for at least an hour.

For chocolate ganache:

300 grams (12 oz) superior quality dark chocolate
225 grams (9 oz) heavy cream
90 grams (4 oz) butter, cut in small pieces


Chop the chocolate into very small pieces. Put into bowl. In a saucepan, heat the cream to boiling point. Remove from heat and pour slowly over the chocolate. Stir gently until the chocolate melts, then add the bits of butter, one at a time, stirring gently and continually until the chocolate starts to thicken. Pour into the shells. Let cool before eating.

Bon appétit et merci Susie, Amy and LK!  I sincerely hope that I got this right.  Happy Macaron-Making!

Sunday, September 21, 2014

Gourmands/Gourmets in training


Je vous présente ma classe 8B.  Here are the little darlings in my 8B class this year.  They are taking French 2.  I taught them last year in French 7 and some of them were in my 6th grade class for students new to our school.  They have to put up with me, a morning person, either first or second period every day (we have a crazy rotating schedule).  But they handle it well, for the most part, and don't growl at me very often.
This is a crew of cookers and eaters.  We have already tried macarons, those wonderful little almond flour French sensations, four times and school has been is session for only one month.
First, we sampled Parisian Macarons made by ER, using a Martha Stewart recipe-


Beautiful and tasty.

Next up, lovely little pink macarons made by MH, using a recipe from I Love Macarons by Hisako Ogita.  MH said she visited Sur La Table and bought a macaron-making kit.  I have a silicon baking mat I purchased at Galeries Lafayette in Rouen a couple of years ago, but I honestly prefer parchment paper.  Maybe I just need more practice with it, though.  The little circles are drawn on it so it is easier to make them the same size.  (How about someone come up with parchment paper with the circles drawn on it??  Maybe I will email the company about that...)


And last, but by no means least, chocolate macarons from LK and AC.  On the same day, no less.


AC's have a chocolate ganache filling (you can never go wrong with that).  LK prepared hers with the help of a pastry chef employed by her parents.  In Durham, her parents are well-known to us eaters.  They own Watts Grocery, Sage and Swift and Hummingbird Bakery.  Chefs par excellence.  I asked LK if her mom's pastry chef would give me a lesson and I am now signed up to take a macaron-making class in October.  Arles Lucy has signed up, too.

Notice how they all managed to get "feet" on their cookies.  Not necessarily an easy task, mes amis.  I have failed at it more than once.

Another day, KC brought in little chocolate cakes for us to sample.  (One of my new 6th graders brought in truffles the same day, so they were photographed together.  I will save the truffle recipe for another day!). 


If you need "real food" to serve before the dessert course, we have also sampled cassoulet, a wonderful dish that I ate in Carcassonne while on sabbatical in 2008.  LJ treated us to that.  


The little darlings reminded me that I can cook for them anytime I wish, too.  Maybe I will soon to repay them for their generosity!

Parisian Macarons

Cookies:
1 1/4 c. powdered sugar + 1 tsp
1 c. finely ground and blanched almonds
6 Tbsp. egg whites (~3 eggs)
1/4 c. granulated sugar
Pinch of salt

Preheat oven to 350F.
Whisk together confectioners' sugar and ground almonds.
In a mixer, whip egg whites with salt on medium speed until foamy.
Increase speed to high and gradually add granulated sugar.
Continue to whip until stiff, glossy peaks form.
Fold in confectioners' sugar until completely incorporated.
Line baking sheets with parchment paper.  Set aside.
Fit a pastry bad with a 3/8-inch #4 round tip and fill with batter.
Pipe i-inch discs onto prepared baking sheets, leaving 2 inches between cookies.
Let batter spread out and dry at room temperature.  (Drop the baking sheets on the counter a few times to get the air out of the cookies.)
A soft skin will form on the tops of the macarons after about 15 minutes.
Bake, with oven door slightly open, until the macaron surface is dry ~15 minutes.
Remove baking sheet to wire rack, let macarons cool, then peel off parchment.
Use immediately or store in an airtight container.
Turn macarons so their flat bottoms face up.
Pipe ~ 1 tsp. filling on half of the cookies and then make sandwiches.
Refrigerate for 1 hour.


Filling:  
3 large egg whites
1 c. granulated sugar
1 c. (two sticks)  unsalted butter, room temperature and cut into pieces

Whisk egg whites and sugar in electric mixer until stiff and shiny (3-5 minutes).
Add butter, 1 piece at a time and continue mixing until butter is incorporated.
Cover and refrigerate.  Bring to room temperature before stirring/spreading.

I Love Macarons

2/3 cup almond meal or ground almonds
1 1/2 cups powdered sugar
3 large egg whites, room temperature and preferably aged up to 3 days
5 tablespoons granulated sugar
1 teaspoon vanilla extract

Directions
  1. Preheat the oven to 280ºF, and position 2 racks in the lower section of the oven. Line 2 rimmed baking sheets with parchment paper. If you have time, draw 1-inch circles on the back of each sheet, spacing the circles at least 1/2-inch apart.
  2. If your almond meal is very coarse, grind it with the powdered sugar in a food processor until fine. Sift the almond meal-powdered sugar mixture twice through a mesh sieve.
  3. Place egg whites in the bowl of a stand mixer (or use a hand mixer), and begin to beat on medium-high. When the eggs are frothy, gradually add granulated sugar 1 tablespoon at a time until fully incorporated. Continue to beat the egg white mixture until glossy and stiff peaks form when you lift the beaters. Gently stir in the vanilla extract. Be careful to not overbeat the meringue (e.g., the meringue takes on a clumpy texture).
  4. Add half of the sifted almond mixture, and gently fold it into the meringue using a flexible silicone spatula. Lift from the bottom, up around the sides, and toward the middle, being careful to not overagitate the meringue and lose too much air. Once the almond mixture is predominantly incorporated, add the second half and repeat the folding motion.
  5. When the almond mixture is just incorporated, you will need to transform the batter into the appropriate texture. Using the flat of the spatula, "punch" down into the center of the batter, then scrape more batter from the sides to the center, and punch again. You will need to repeat this 10-15 times (or more, depending on your arm strength and the beginning texture of your batter) until the batter slowly and continuously drips back into the bowl when you scoop it up with the spatula. Think of the consistency of molten lava. For the best results, punch the batter a few times, check the consistency, then punch a few more times, etc. Do not make the batter too runny or the macarons won't rise as they should, and you could end up with oil stains on the surface.
  6. Pour batter into a pastry bag fitted with a 0.4-inch tip. In a pinch, you can also use a gallon-size Ziploc bag: just snip a teeny bit from one of the bottom corners. Twist and clip the top of the bag to avoid overflow. On your prepared baking sheets, pipe out 1-inch rounds in the circles you drew (remember to draw the circles on the back side of your parchment to avoid ink or pencil stains on your macarons!).
  7. Holding the baking sheet in both hands, rap each baking sheet firmly on the counter two or three times. This smooths out the tops and helps form the "pied" or frilly foot on the bottoms of the macarons. Allow the piped macarons to dry, uncovered, for at least 15 minutes. The macarons should form a very thin, smooth crust where, if you tap it lightly with your finger, the batter will not stick to your finger. If after 15 minutes, the batter is still sticky, let it dry longer. This may take up to an hour on humid days.
  8. Place both baking sheets in the oven and bake for 15-18 minutes. After the first 2 minutes, open the oven to allow any excess humidity to escape. Halfway through, swap oven racks and rotate the sheets for even baking. The macarons are done when they are baked all the way through and the shells are just hard. Take care to not underbake (insides will still be mushy) or overbake (tops will begin to brown). Remove them from the oven, and cool on baking sheet placed on a wire rack.
  9. When fully cooled, assemble the macarons with your choice of filling. The assembled macarons can be stored in an airtight container in the refrigerator for up to one week.
Basic Buttercream Filling


7 tablespoons unsalted butter, softened
2 egg yolks
1/4 cup granulated sugar
3 1/2 tablespoons milk
1 teaspoon vanilla extract
Just like the basic macaron recipe, the basic buttercream filling recipe can be customized with endless flavors and colors. But don't stop at buttercream! Try jams and preserves (or even Nutella!) straight out of the jar, or whip up a quick chocolate ganache for a decadent spin on the macaron.
1.     Cut butter into pieces, and mash with a spatula until the consistency resembles mayonnaise.
2.     In a small bowl, whisk the egg yolks, then add the granulated sugar, and whisk until the mixture lightens to an off-white and you can no longer see the granules of sugar. Add the milk, and whisk to combine.
3.     Pour the egg mixture into a small saucepan, and heat over low heat, whisking frequently to ensure that the mixture does not curdle or scorch. Cook until the mixture becomes thick and custardy, like pudding.
4.     Pour the egg mixture back into its bowl, and whisk constantly until it returns to room temperature. Whisk in the butter in three batches, add the vanilla, and stir until smooth and all ingredients are fully combined. Pipe or spread onto one macaron half and sandwich between the other.

Natalie's Melting Chocolate Cakes
makes 12

200 g (7oz/ scant 3/4 c.) butter, cubed
200 g (7 oz/ 1 1/3 c. dark (bittersweet) chocolate (minimum 70% cocoa solids), broken into pieces
200 g (7 oz/scant 3/4 c) castor sugar (superfine sugar)
4 eggs
1 tsp plain all-purpose flour

Preheat oven to 180˚C (350 F˚/gas mark 4).
Place the butter and chocolate in a heatproof bowl over a pan of simmering water and stir until the chocolate has melted.  Transfer to a large mixing bowl with the sugar, stir with a wooden spoon and leave to cool a little while.
Add the eggs to the chocolate mixture, one at a time, stirring well after each addition.  Finally, stir in the flour and mix well.
Pour the cake batter into 12 mini-loaf pans (or prepared muffin tins) and bake for 12-15 minutes until the centres are set but still a little wobbly.  Turn the oven off but leave the cakes inside for another 10 minutes, then transfer to a wire rack to cool completely.
You can store these covered, in the fridge, for up to 2-3 days.  Take out 30 minutes before serving.


Easy Crockpot Cassoulet
serves 6

1 Tbsp. olive oil
1 large onion, finely chopped
4 boneless skinless chicken thighs, coarsely chopped
1/4 lb. cooked smoked sausage, such as kielbasa or spicier andouille, diced
3 cloves garlic, minced
1 tsp. dried thyme leaves
1/2 tsp. black pepper
4 Tbsp. tomato paste
2 Tbsp. water
3 cans (15 oz each) great northern beans, rinsed and drained
3 Tbsp. chopped fresh parsley

Heat olive oil in large skillet over medium heat.  Add onion to hot oil and cook, stirring, until onion is tender, about 4 minutes.  Stir in chicken, sausage, garlic, thyme and pepper.  Cook 5-8 minutes, or until chicken and sausage are browned.  Stir in tomato paste and water.  Transfer to slow cooker.  Stir beans into the chicken mixture.  Cover and cook on LOW heat for 4-6 hours.  Before serving, sprinkle the chopped parsley over cassoulet.  (You could put it under the broiler for a few minutes before serving- without the parsley- to get a crust on the top- the way it was served in Carcassonne.)

When I am Chez Fanny, she serves me cassoulet.  And, of course, in France you can find seriously good duck cassoulet in a can from Castelnaudary, a lovely spot in Languedoc known as the world capital for this specialty.  


Bon appétit to all cookers and eaters, young and old alike!